
Create corrugated cardboard totems

Rate this tutorial
No votes yet

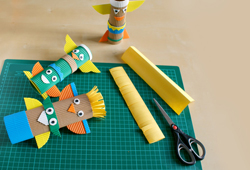
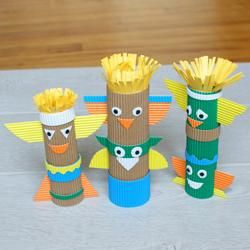
Create corrugated cardboard totems with your students: an original craft project which can be made individually or in groups to create a large totem.

This manual activity can complement work on American Indians.

Materials: 

Do you know what totems are for

- Totems created by the Amerindians represent their families, their clans and significant events in their history.
Made from carved wood, these colourful posts show different animals, each with a symbolic meaning, and can be up to ten metres tall.

Making the tube base

Cut a rectangle out of the corrugated cardboard. Adjust the size of your rectangle to the size of the totem you want to make:
if this is a group project, make a giant totem so that each child can contribute.

Glue the two long sides of the rectangle together; the corrugated structure creates a beautifully round tube.

Decorating the totems

Using the corrugated cardboard in different colours, cut out geometric shapes and strips in different lengths before glueing them on to the cylindrical base you've already made.

For the parts at the top and bottom (the feet and the wings), cut 2 slits on opposite sides of the tube and insert the parts (ensure that the card's corrugation is horizontal for a stronger structure).

Adding the details

Using the white corrugated cardboard, cut out small circles or semi-circles, then stick them on the totem to make the eyes. Finish them off by adding black dots, made with a hole punch.

Decorate your totems with small items: ears, beaks, triangles, borders, etc.

Adding hair

Using the yellow kraft paper, cut out and fold strips of paper which you can then snip with scissors.

With the fringing facing up, glue this band to the inside of the totem and ruffle this kraft paper hair up as much as you want.

Totems can be used as decoration or as pencil pot (don't forget to add a bottom).