
Making a secret egg box from card

Rate this tutorial
No votes yet

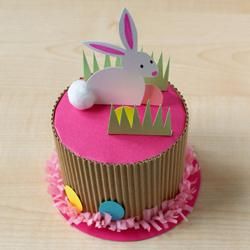
For Easter, make these cute round boxes from corrugated card with your children.

Everyone can start with the same basic structure and then they can personalise it in their own way by varying the colours and positioning of the decorative elements. The perfect hiding place for their chocolate eggs!

Materials :

  • Templates for the round box, rabbit, eggs and grass​​
  • Canson® natural brown corrugated cardboard
  • Canson® Colorline 220g/m² paper: fuchsia (dark pink), pale pink, yellow, turquoise and pale green
  • Canson® silk paper in pale pink
  • Glue
  • Scissors
  • Felt-tip pens

Do you know where the Easter Bunny comes from?

Using a chick would be a much more obvious choice than a rabbit. There are a few theories: the rabbit may have come from Germany, where a child from a poor family thought that the rabbit wandering around its garden was the reason behind the hidden eggs, some also claim that it’s because the animal has lots of energy and is a symbol of abundance and therefore a symbol of the returning springtime. 

Making the box

  • Download the PDF to get the template.
  • Trace the template onto the back of the corrugated card and the coloured paper you have chosen for the box.
  • You can let each child choose their own colours.
  • Cut out the 4 parts of the box and fold the flaps.

Assembling the box

  • Glue the flaps on the circle and stick the corrugated card strip around it. Leave to dry.
  • In the meantime, roll-up the strip of pink paper and stick it with about a 1 cm overlap.
  • Next apply glue to the flaps and place this little tube in the middle of the leftover circle of paper.

Making and sticking the decorations

  • Cut 25 x 3cm strips out of the silk paper. Fold them lengthways and cut fringes with the scissors. Stick your fringing to the bottom of the corrugated card lid. Fluff your fringing to give it volume.
  • Tip:

to give a bigger effect of volume you can glue 2 strips of fringed silk paper to the bottom of the lid.

Cutting out the decorations

  • Trace and cut out the rabbit, grass and egg shapes using the coloured paper

Finishing off the box

  • Add eyes, ears and a nose to the rabbit with the felt-tip pens.
  • Gently fold the bottom edge of the items to be glued to the box and attach them with a blob of glue.
  • Glue the white pompom to create the rabbit’s tail. Allow each child to personalise their box by choosing how many of each decoration they want and in which colour.