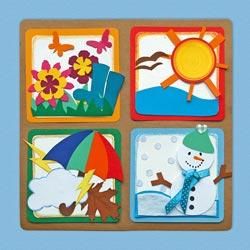
Create a four seasons picture

Rate this tutorial
Average: 4.2 (5 votes)

Recreate the 4 seasons on a picture using fun combinations such as the colours and flowers of spring, the summer sun that brightens the holidays, the harmony of autumn colours and the snow when winter comes.

Materials:

  • Smooth Canson® Vivaldi® coloured papers (120 g/m² or 240 g/m²) orange, hazelnut, chocolate, meadow green, moss green, fuchsia pink, heather, tomato, sky blue, primary blue, royal blue, sky blue, straw yellow, golden yellow, sunflower yellow and white
  • Canson® “C” grain® white drawing paper
  • Canson® Vivaldi® coloured smooth paper (120 g/m²), choice of colours for the background
  • Round hole punch
  • Colouring pencils
  • Colorful ribbon
  • Glue
  • Scissors

Step 1

Download the PDF to get the template.

Start by making the background that you will stick the seasons cards on. For this, you need to cut the coloured sheet of paper to the dimensions of 16 x 16 cm.

For each season, cut out squares from the coloured sheets of 6.5 x 6.5 cm.

Step 2

Cut four 6 x 6 cm squares from the Canson® “C” grain® sheet, then paste them on the coloured squares.

Create a frame by colouring in the borders.

Step 3

Depending on each season's characteristics, select figures to suit it from the template. For example, pick the umbrella, leaves and the bolt of lightning for autumn.

Trace these things onto the coloured paper and cut them out as shown in the picture.

Step 4

As you go, you can stick them on the cards.

Step 5

For spring, you can use grass, flowers in various different colours, butterflies and boots.

Stick these figures on the spring card after cutting them out.

Step 6

For the summer card, you can draw a sun, the sea, and some seagulls. Make the sun from circles of different colours and shapes.

The sun's rays can be made from thin strips of the orange paper.

Cut them out and assemble them as shown on the picture.

Step 7

Use the white sheet for the snow and colour it light blue. Then cut it out and glue it to the bottom of the winter card.

You can then create a snowman out of two circles.

Don't forget to decorate your snowman with accessories like ribbon, buttons and fabric.

Step 8

Using the hole punch, make some snowflakes.

Glue all of these on the winter card and colour the snowflakes light blue.

Step 9

After you finish all your cards, stick them on your background.

If desired, add small labels to each card to identify the seasons.

There you are, your 4 seasons picture is finished!