
Make a 3D paper trophy

Rate this tutorial
Average: 2 (1 vote)

Time required: 1 hr 30 mins

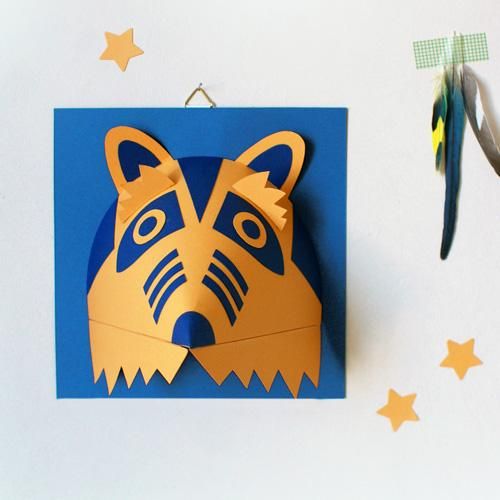
Create this ornamental racoon figure and easily add your own personal touches. It is ideal for decorating your home or brightening up your walls while giving them that "hand made" touch.

List of materials:

Canson® Iris Vivaldi 185 g/m2  Leather and Ultramarine
Canson® Iris Vivaldi 240 g/m2  Azure blue
Craft knife - scissors
Paper glue
Template: 3D paper trophy


Step 1 : Templates

Download and print the templates on to your gabarits Download and print the templates on to your Canson® Iris Vivaldi 185 g/m2.

Step 2 : Cutting out

Cut out all of the parts for the raucoon figure, some of which are easy to cut out with scissors.

Step 3 : Scoring

Score the folds (dotted lines) using a craft knife or scoring tool and ruler.

Step 4 : Head

Apply glue to the tab, then bend the paper round to join up the two ends.

Place your folded racoon head on the table and press firmly along the inside length of the tab until the glue sets.

Step 5 : Gluing on the other details

Start by gluing the long triangle in the middle of the top of the head.

Next, glue the two eye markings on either side, and continue with the other details, placing them symmetrically and ensuring that the printed outline is not visible.

To attach the nose, bend the paper using a round tool such as the end of a paintbrush prior to gluing, thus ensuring that it fits around the snout without splitting the paper.

Step 6 : Assembling the eyes and ears

Glue the smaller circles into the centre of the larger ones to form the eyes.

Glue on the inner ears in a similar manner.

Attach the ears by gluing the tabs into the inside of the figure and glue the eyes on top of the dark areas, making sure they are symmetrical.

Step 7 : Fur

Apply glue to the tab on the fur piece for the first side of the head and glue to the underside of the head, holding for a few seconds to help the glue set before proceeding to glue the second fur piece.

Once the glue has set, you can tilt them as required.

Fasten the eyebrows in a similar manner, ensuring they are symmetrical, with the printing concealed.

Step 8 : Square mount

Cut the square mount out of the 240 g/m2 sheet of Sky Blue Canson® Iris Vivaldi paper which will form the background for the trophy, and cut out the small slit using your craft knife.

Attach a fastener, sticking it in the upper centre of the square.

Slide the tab on the top of the figure into the slot and glue in place.

Turn the work over and fold over the second tab, which you should also stick down.

Holding the figure by the snout, press it down gently until the glue has set.