A mobile composition, intimate and, of course, subjective, the travel album is an illustrated acccount marked by creativity. Sketches, watercolors, photos, text... all will fit within the travel album.

1. A little history
Geographical surveys of the first explorers, plates from naturalists, journals of master mariners... the travel album was born of the necessity to put in images and in words the great voyages of the past. Travel, for pleasure or not, was born before photography, and drawings or paintings were the only way to depict the exoticism of faraway lands. Some artists are linked forever with certain destinations: Delacroix with Morocco or David Roberts with Egypt, for example.
If photos today permit us to bring back moments from the end of the world, the travel album remains the best way to reflect the emotion, the magic of encounters and discoveries.
2. What is it?
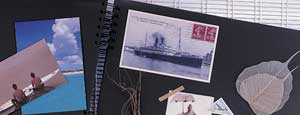
- A visual account, illustrated with sketches, more elaborate drawings, watercolors, but also photos or postcards. A creation, mixing images and text: from a simple commentary to more detailed stories, poems...
- You may make a chronological presentation, but there is nothing to keep you from using using geographical or thematic divisions.
- Make it all by hand or include an assortment of souvenirs: entry tickets, newspaper clippings, dried flowers...
-
In short, it is your own personal creation. You are, therefore, free to include whatever you wish. It may also follow your internal voyage or follow your daily life.
Tip: prepare an elaborate notebook
According to the degree of sophistication that you want to achieve, you will decide, perhaps, to create only a few sketches at the moment, and then finalize your drawings and assemble your album upon return.
- Be sure to keep detailed notes about your sketches (or take photos to record the details).
- Keep your designs, with the elements to include, in envelopes sorted according to place and by date.

3. Choose your notebook
Many ready-made styles are available in the marketplace. You can also use one designed for drawing or painting.
- Choose your paper based on the media that you plan to use: textured for pastels, smooth for pencil, watercolor for wet media (including ink)...
- There is nothing stopping you from creating your watercolors on a separate product (for example a block bound on all 4 sides), and to insert it later in your travel notebook or album.
- Make your album yourself, choosing a rigid card stock for the backing, a decorative card for the cover, and a variety of paper sheets: handmade, tracing, white or colored drawing paper, watercolor, etc. Bind it all together with a spiral, rings, ribbons etc. In this way, you will personalize your album from A to
Tip: the right format
If you plan to work during the trip, choose a smaller format (pocket-sized to A4), more practical! If making your album on your return, this constraint will not exist. But consider all that you would like to include before deciding on the size of your pages: a travel album may be thick, but should never appear too small.

4. Advice from the pros
- Be selective: even if a travel album is, by definition, very flexible, you will never be able to include all your souvenirs. Use the most notable to their advantage!
- Keep it spontaneous: even if you assemble your album calmly, several weeks after your return, attempt to capture the magic of the moment... rather than drowning your emotions in over edited text.
- Vary the style: you may tell a story, but also surprise your reader. Use different page formats, with a variety of drawings and of watercolors, etc.
- Make use of space: the eye of the reader must always know where to rest. Manage the open areas and avoid overfilling your pages, which reduces their impact.
Recommended product:
180° Art Book™
See also :
Drawing
Drawing: Create a sketchbook