
Doing a Watercolor portrait: shadows, light and facial expression

Rate this tutorial
Average: 3.6 (11 votes)

Level: intermediate  / Time of execution: 2 hours 

Artist: Mathias Braun  

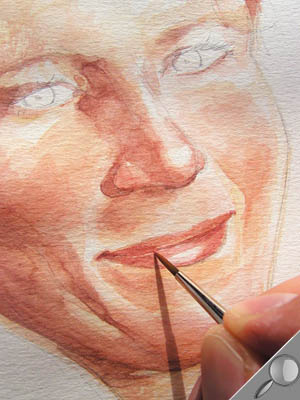
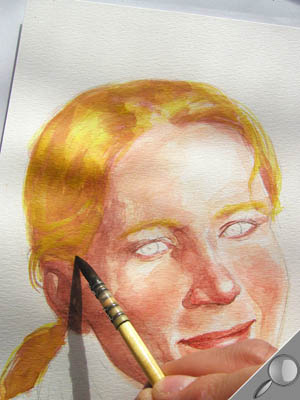
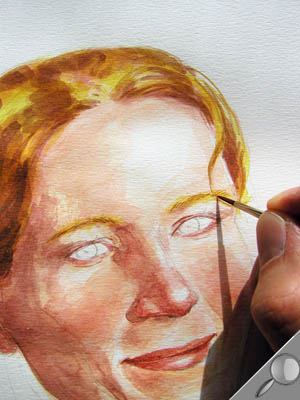
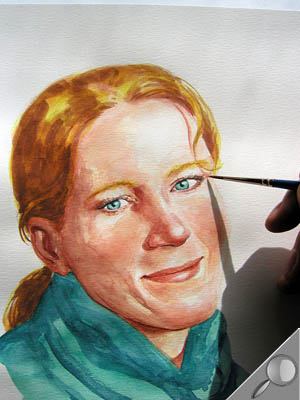
Some simple formulas can help you put expression in a face with watercolors: working in a large format and making use of white spaces, for example. Your challenge: learn how to handle proportions, because you will tend (at least to begin with...) to enlarge some aspects (eyes or mouth) and reduce others (ears, neck, forehead, hair). Finally, to best convey the model's personality, remember to represent him or her down to the shoulders: this allows you to show where the head fits, and to give it an attitude, even a familiar expression.

Material

  • Paper: Canson® Montval® 200 g/(m)2 - fine grained.
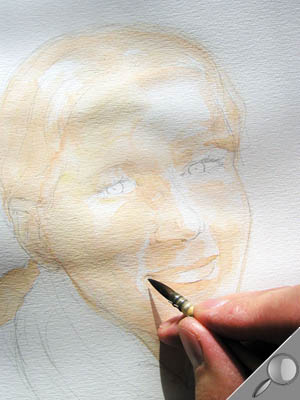
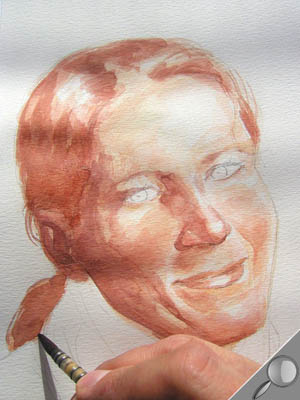
  • Colors: Rembrandt® primary yellow, red, purple, ultramarine blue, emerald green and burnt sienna watercolors in pots.
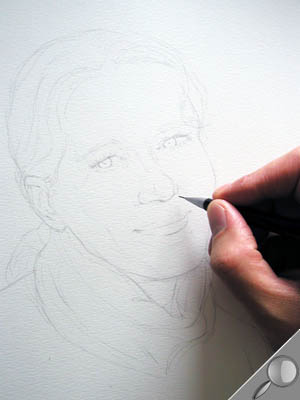
  • Pencils and paintbrushes: 1 very well sharpened, medium (HB) pencil or 1 fine mechanical pencil (0.5 mm), 1 wash brush, 1 medium round pointed (squirrel) paintbrush, 1 fine round pointed brush (sable) for finishing.

Step 1

Do a quick pencil sketch of the subject.

Use the pencil (which needs to be perfectly sharpened so you can draw as precisely and lightly as possible), do a quick detailed sketch of the facial contours, then of the neck and shoulders). Insert recognizable aspects: eyes, nose and mouth. Finish with the ears and hair. Make sure to erase any mistakes.

Note: avoid being too specific with details (eyelashes, eyebrows, pupil, iris etc.) because you'll be doing them in watercolors.

Step 2

Applying a wash to give the face tone and volume.

Prepare a fairly large amount of wash (you'll be using it again later): primary yellow and a bit more red (to make light orange). Dilute considerably before applying the color.

Add color to areas where the face is shaded; leave some white spaces in lighted areas.

Your gestures are what shape the face and give it expression: don't fill it in all the way. Instead, add color to various areas, but don't hesitate to go outside the pencil sketch contours.

Step 3

Mark shading and darker areas. Reuse the preceding mix, apply it, still using the wash brush, but less diluted: the colors should be denser.

Add the facial shadows, the shadow cast by the nose, and work on the hair. Leave some white spaces in areas where light reflects.

Tip: soften the shadows' contour to make them more realistic. Right after applying color, run the cleaned, still moist paintbrush over the edges of that particular area.

Step 4

Refine the facial details.

Prepare a wash by mixing red with a dash of purple. Work with the medium round pointed brush, making sure, once again, not to define the pencil sketch too much.

1) The mouth: add more or less diluted touches, depending on where the light is reflecting. To make it look like it is glowing, leave a white space in the middle of the lower lip.

2) The eyes: use the same wash, diluting it a little more. Add color, still making sure not to shut in the forms, because leaving little white spaces is part of creating volume. Those spaces correspond to raised areas where light reflects the most.

Step 5

Developing the hair.

Prepare a thick, pure yellow wash. Use the wash brush to apply it with a sure gesture to the hair: don't be afraid to go outside the lines; treat it as a general area to be defined later. Quickly sketch the eyebrows the same way. Remember to leave some areas of the underlying color visible.

Step 6

Doing details of the hair.

Prepare a red and purple based wash, with a dab of ultramarine blue (to strengthen the mix). The resulting color should be thick. Paint little dabs with the wash brush.

Use the fine round pointed brush for detail areas: Strands of hair, eyebrows.

Step 7

Doing the pullover and eyes.

Prepare a mix of emerald green and ultramarine blue (a tone complementing the one used for doing the skin: for a fairly strong contrast).

1) The pullover: dilute the color and paint it on quickly.

2) The eyes: apply the same color with the medium round paintbrush. Note: leave a clear white space to show the light reflecting in the eye. This reflection is what gives the portrait its sparkling, live look, so it needs to be done very carefully.

3) The pullover: quickly paint shadows to add volume. Use the wash brush to apply the same color, this time less diluted.

Step 8

Carefully adding  finishing touches to eyes.

Work with the fine round pointed brush.

1) The iris: use the rest of the mixture to add shadows to the pullover, draw the contours of the iris and its upper part (where the eyelashes are casting their shadow). Remember to leave some white spaces.

2) The eyelashes and pupil: prepare a slightly diluted mix of purple, a hint of Sienna and a hint of blue. By using a strong purplish shade, you can keep the overall tone light (unlike black). Do the pupil lightly, leaving some white space. For the eyelashes: start from the eyelid and draw them with a flowing gesture, for a tapered stroke.

Step 9

Develop the shadows and dark parts. Here, it is better to use a pure, slightly diluted color instead of a dark shade: prepare a mix of pure red and (just a hint of) purple.

Use the fine round pointed brush to develop any shadows that are not strong enough with light paint strokes: the corner of the mouth, the base of the chin, the nostrils, ears, crow's-feet etc.

Tip

You can always rework the shadows while finishing your piece, to bring everything into balance: the base of the chin, the shadow cast by the lock of hair on the forehead etc. Just use the same wash as in step 9, still with the round pointed brush, but dilute it some more this time.