The word "perspective" comes from the Latin perspicere which means "seeing across." What does it mean in drawing and painting? This is a process for representing, on a two dimensional flat surface, what is seen three-dimensionally. There are no end of possibilities…
Drawing: Secrets of perspective
Rate this tutorial
1. Small deceit, major effects!
To represent a perspective, you need to take four factors into account:
- spatial reality
- an observer (usually, that's you)
- the flat surface (the drawing paper or canvas to be painted)
- a mode of transformation
Transforming is what it's all about. Admittedly, the image has to be deformed a little to create an illusion of depth.
Now it gets a little more complicated…

2. First, locate the horizon
The horizon line is the key element. It is up to you to locate it. Yes, but how? It's simple: hold your head straight and look in front of you. The exact place your eye is pointing to is where the horizon line is. In fact, the horizon line is located… at eye level!
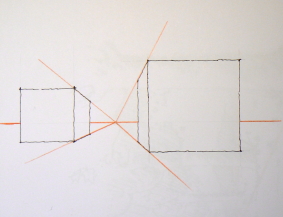
Now, place the vanishing point or points on the horizon line.
These imaginary points are there to help you construct your "work" in perspective. Because it is exactly at the vanishing point that the base lines will converge.
3. Not one but SEVERAL perspectives!
In fact, there are 4 types of perspective:

- The cavalier perspective: no vanishing point. All of an object's parallels remain parallel on the representation. Much used in industrial design, it is considered "incorrect" by the human eye.
- One-point (or central) perspective: one vanishing point. Horizontals and verticals remain parallel, just the side lines converge towards the vanishing point. To the eye, it is incomplete.
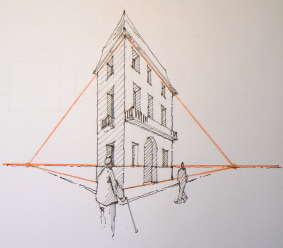
- Oblique (or angular) perspective: two vanishing points, located on the horizon line. All the vertical lines are parallel. This is the perspective most frequently used in drawing.

- The aerial (or atmospheric) perspective: three vanishing points. All the parallel lines converge towards a vanishing point. This is the most "correct" perspective.
Did you know?
What a genius that Leonardo da Vinci was!
By the Renaissance, paintings included the concept of aerial perspective. With his famous “sfumato” method (Italian for “in the manner of smoke”), da Vinci is one of the inventors of the technique. He used it in the background of the Mona Lisa.
3. Perspectives and colors
You need more than just geometry to create a good impression of depth! Fade and blend tones little by little, from the foreground to the background in your composition: that way, you decrease the contrasts and increase the realism of your perspective.
Practical advice: On the road…
Imagine a long tree-lined road. The trees are represented as smaller and smaller, the farther they are from you. The trees in the foreground are a very vivid, bright brown and green while those in the background are more muted colors.
Recommended product:
Imagine