
Creating various shades of a colour using the aquatint technique.

Rate this tutorial
Average: 4.5 (6 votes)

Estimated time: 3 hours  

Level: intermediary

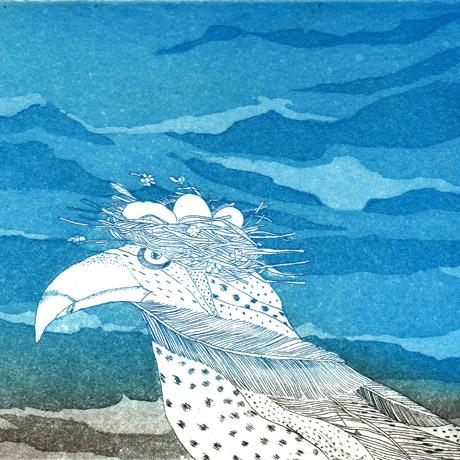
Artist: Charlotte Reine

www.charlottereine.fr

Aquatint is a technique that makes it possible to create patches of colour on the copper plate thanks to graining created by powdered resin. Once it has melted, the area covered with resin will retain the ink and make it possible to create various shades of colour according to the length of time the acid bites the plate. 

Matérial

Paper : Canson® Edition

For engraving: ferric chloride, a 10 cm x 15 cm copper plate, spirit varnish, rosin, several tubes of intaglio ink, 1 metre of tarlatan, methylated spirit, white spirit.

Accessories: a plastic tray – approx. 15 or 20 cm, a spirit lamp, an intaglio printing machine, a dusting box.

1. Preparing the plate

Clean your copper plate with blanc de Meudon mixed with methylated spirit.
Using a brush dipped in liquid spirit varnish, cover the surfaces you want to remain white.

2. Applying the rosin

Vigorously turn the crank of the dusting box: this will project powdered rosin resin to the top of the box. Place your plate in it.

Leave it for approximately twenty seconds: the resin will settle on your plate and it will be covered with a layer of resin dust.

3. Cooking the dust

Place your plate on a grid and heat it using a spirit lamp. The resin will become translucent as it melts.

The dust particles will bubble slightly as they heat. Don't do this for too long as the dust could be overcooked.

4. Biting

Submerge the plate in a tray filled with fresh ferric chloride

Immersion time necessary for this engraving is 3 minutes.

Take the plate out and rinse abundantly with water. Drain it and dry it.

Tip

Remember to protect the back of your plate with tape and make a tab with the tape to facilitate the immersion process.

5. successive biting

Cover the parts you want to keep clearer with spirit varnish. Let the varnish dry and submerge the plate in the tray of ferric chloride again for 4 minutes. Rinse well with water.

Repeat this operation, leaving the plate in the ferric chloride for the same length of time. Rinse abundantly with clear water and dry with a clean cloth. Clean the plate with methylated spirit.

6. Inking the plate

Ink the bottom of the plate with sepia ink and the top with blue ink for example.

Wipe each colour separately with a piece of tarlatan until the image appears, then finish wiping the rest of the plate

(Cf. Tricks of the trade: how to ink, wipe and print produce good prints).

7. Printing the engraving

Place your inked plate on a paper on which you previously drew a frame to centre it.

Place your Canson® Edition paper, previously dampened. Pull down the felts and put through the press. Your proof is printed!